Last Updated on October 25, 2021 by Adam Henige
* Updated 10/22/2021
Google likes fast sites. If you weren’t already aware of that, you’re welcome. There’s good reason for this of course, as users also like fast websites and Google’s in the business of serving you up the best results when you make a search. If they give you a slow result, they’re not doing their job. Also, Google, for all its wealth and power, does have a finite amount of resources to crawl the web, and if you waste their time with slow loading websites it’s well within reason that they would punish you.
Large images and photographs can CRUSH your site speed
A large percentage of the websites we work with have problems with image file sizes, and it’s one of the easiest things for people to correct.

While your developer or designer may have made some decisions that slowed down your site, there’s really no excuse for your blog being full of 2-megabyte photos (that’s too big). There are a million tools you can use to check a page’s speed, here are a few examples:
- Pingdom – This tool gives you an individual breakdown of a page’s loading speed, the size of individual elements and how long they take to load and an overall score for the page.
- GT Metrix – This is basically the same as Pingdom, but gives you results from three different sites to compare a page’s scores.
- Google Developers’ Site Speed Tool – My preferred tool, this is Google’s avenue for direct feedback on a page’s speed, including image size optimization.
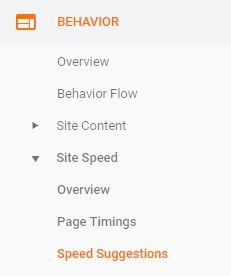
- Google Analytics – Unknown to many users, Google Analytics actually provides scores from the Developers’ Site Speed Tool in bulk. Under the Behaviors > Site Speed > Speed Suggestions.

You said “quickly” optimize images, didn’t you?
Yes, I did, and here’s the quick and dirty way to identify a big list of image files that are too darn big and where they live on your site. First, you’ll need Screaming Frog SEO Spider. The free version will crawl 500 URLs on your site; if you need more than that you’ll have to pony up a little money to pay for the full version. Otherwise, you can just tell Screaming Frog to start crawling in different sections of your website until you think you’ve covered everything and download a bunch of separate reports. Okay, I’m getting ahead of myself, here’s the actual process to build your list of images to fix:
- Download Screaming Frog SEO Spider
- Have Screaming Frog crawl your site
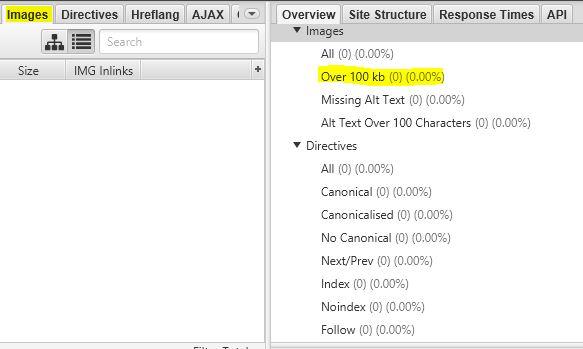
- Select the Images tab
- Select the filtered results tab in the right-hand column for “Over 100kb”

- Once your crawl(s) are complete, you’ll want to use the top menu to select Bulk Export > Images > Images Over 100kb Inlinks
The file this exports will give you a list that contains the URL of the offending image, the size of the image, and the inlinks, or the pages where these images live on your site. Excellent, right?
Now, how do I optimize the images?
Great question. You have a few different options here, and they require different amounts of effort. If you’re looking for a quick and dirty way to shrink down massive images, you can just go ahead and compress them in bulk. Now, if the images are being resized via CSS this isn’t going to be a perfect answer, but it should at least significantly trim down the file sizes on your images. To do this:
- Download the Google Chrome extension TabSave (sorry, I’m only explaining this for Chrome users) and paste in the list of image URLs. This tool will let you download them all in bulk.
- Take your files and drag and drop them into a bulk image compression solution like TinyPNG and then download the resulting, compressed files.
- If you have FTP access to your site, as long as the image file names have stayed the same (i.e. the compressed image file for the image from http://mysite.com/images/picture1.jpg is still named picture1.jpg), you can simply go to each of your image folders and replace the files via FTP.
- Alternately, if you’re not familiar with FTP, you can just go page by page in your content management system (WordPress, Blogger, Drupal, etc.) and use your editor to replace the images.
If you REALLY want Google friendly optimized images, however, you’ll have to take a longer route. To do this, you’ll need to go page by page through your list of inlinks and run them through the Google Developers’ Site Speed Tool and download the resized images. You can download a .zip file for each page with Google’s perfect version of compressed and cropped images.

This can save a ton of space over simply compressing images, particularly if you have images that have been uploaded to your site directly from your smartphone or a digital camera with massive, print-friendly image sizes. Needless to say, it slows down browsers when they have to load and resize an image that’s bigger than your whole monitor only to display it at 400×300 pixels.
No more Google option
As you can see above, the option to simply download optimized images from Google has gone by the wayside (CURSES!!!). GT Metrix now offers a similar option where you can download optimized images, but I’ve found it to be pretty hit or miss.

So, what are the other “easy” options?
- Google themselves suggests using a plugin that will optimize images for you. There are several options here, but depending on how big your site is and the number of images that need to be optimized, you can simply add one of these plugins and clean up your images relatively quickly. Here’s the list of WordPress plugins that Google suggests.
- Another option is using an image CDN. Without getting into the weeds, a CDN basically lets you host your images elsewhere and the service quickly feeds optimized images to your site when it loads. It cuts down on your own server response time and leaves the burden of optimization up to a dedicated service. Cloudflare is probably the most known provider, but if you’re looking to go cheap, there are some free services like Cloudinary available.
What’d I miss?
I’m sure there are a million other ways to do this, and if you have ideas, please share in the comments below!

Leave a Reply