I’m new to Google Tag Manager (GTM). I’ve known about it for a while but when I first heard about GTM, I opened the interface and quickly closed it again because it was daunting. Recently I was tasked with adding tags for click events on some of our properties. I muddled my way through with the help of some online tutorials and got the job done. After realizing the power of GTM, I quickly became a convert…borderline evangelist. This thing is powerful. Here’s my story.
The Problem
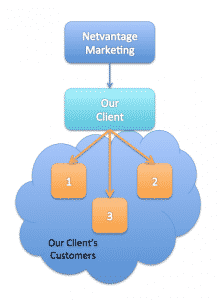 We have a client that acts as a directory service in their industry. Our client has a website full of searchable profiles for their customers and they refer traffic to their customers. Our client wants to be able to generate reports that show how much traffic they are sending to each of their customers. Trouble is, our client does not have access to their customers’ analytics. So we need to be able to track the orange line referrals in the image to the right using only our client’s analytics. (Click image for a larger view.)
I know, you’re thinking, “Just look at website exits.” That would be fine except that often the outbound links are directed at a 3rd party vendor before bouncing to the end client. So now we have to track orange, red, and black lines. Notice, it’s not an “always” thing…it’s a “sometimes” thing…which makes our lives doubly complicated.
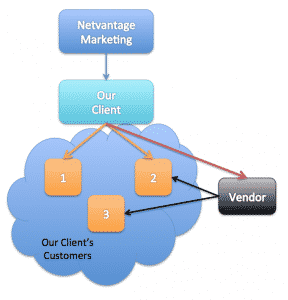
Oh, yeah! Did I mention that our client is constantly adding new customers and removing old ones…and that not all of them use the same 3rd party vendor? You can see how this referral web gets complicated quick, fast, and in a hurry.
The Solution
The solution is actually two steps. First, we will use GTM to track all outbound links. Then we will set up campaign link URLs to track exits to a specific client regardless of whether or not that link goes through a vendor first.
If you don’t have GTM set up then you need to do that first. There are plenty of tutorials online detailing how to do that and I’m not going to duplicate those efforts. Look here for examples.
Step 1: Tracking Outbound Links in Google Tag Manager
- Log in to GTM and navigate to the “Tags” section. Click NEW to create a new tag.
- Name your tag and then click to configure your tag.
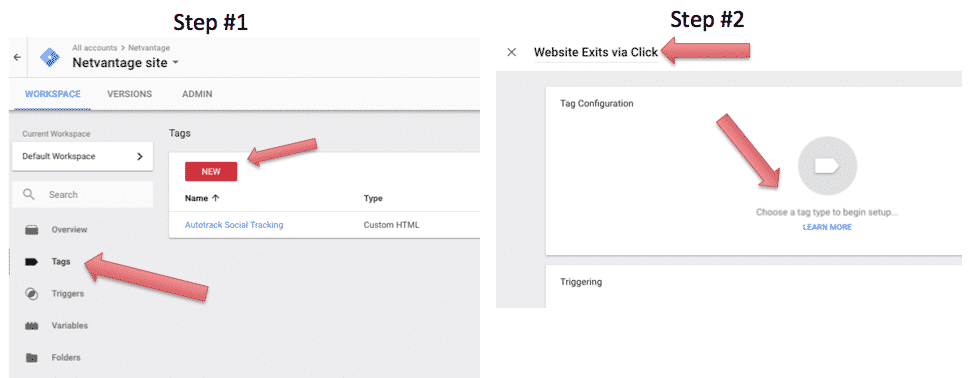
- Choose “Universal Analytics” as your tag type. If you’re still using classical analytics, update now. If you haven’t set up GTM prior to this then you’ll be asked for your GA Tracking ID. Go ahead and put that in if you need to.
- Our “Track Type” will be “Event”
- Next, you have to set your event tracking parameters. These can be any text you type in the boxes or any of the variables that you can select from the GTM interface. For my purposes I would use:
Track Type: Event
Category: Website Exit
Action: URL Click
Label: {{Click URL}} NOTE: “Label” is a GTM variable that is accessed by clicking the lego piece to the right of the input box.
Non-Interaction Hit: True
Google Analytics Settings: the GA tracking ID variable you used to set up your GTM account. - Now we have to create a trigger. Click somewhere inside the “Triggering” box, then click the blue “+” in the upper right corner to create a new trigger.
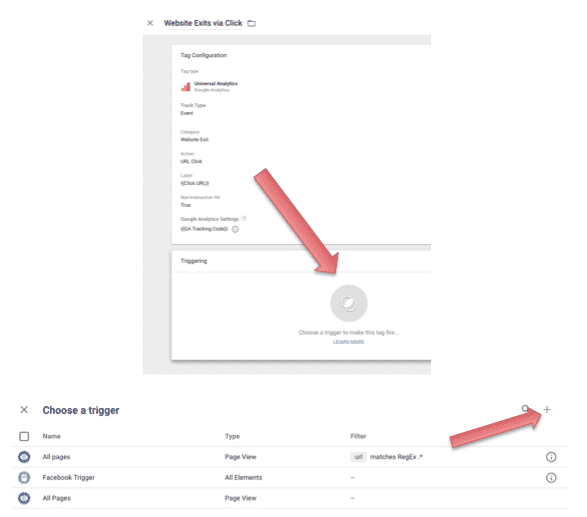
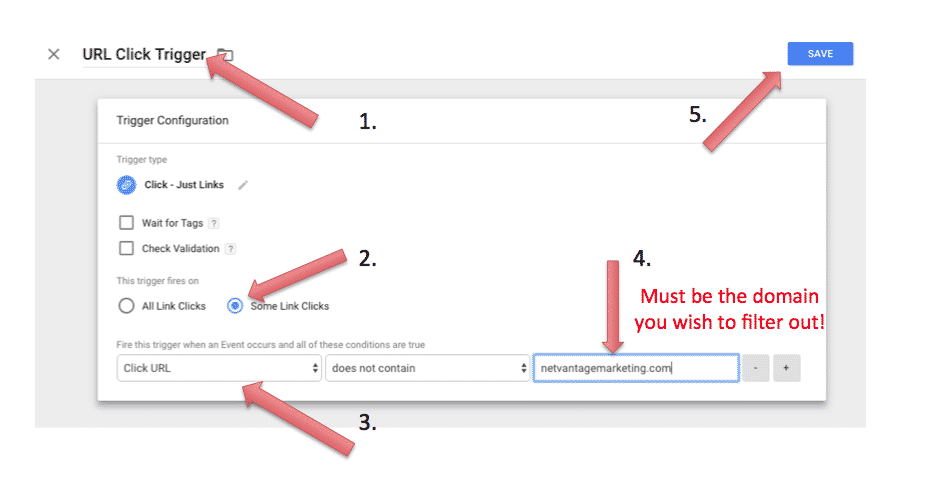
- Name your trigger and click the middle of the box to choose your trigger type. For trigger type select “Just Links.”
- Tell your trigger to fire on “Some Link Clicks” and set up your conditions to filter out your own domain name (or your client’s or whoever’s). Then click “Save.”
- Click “Save” again in the new tag window. Then click “Submit” in the upper right of the main GTM window.
- You’re done! You’re now tracking all site exits!
Once your website has a chance to collect data, you can view these site exits in Google Analytics by going to Behavior >> Events.
…but we’re not done yet! That’s OK, I’ll wait while you go get a cup of coffee…or a beer.
Step 2: Tagging HREF Links for Easy Reporting
This step is a lot less complicated to implement. However, I suggest that before traveling down this road, you do some long thinking about setting up a strategy for what you will track and how you will name things. We are going to use a custom campaign builder to generate a URL for us and then we will use that URL on our site to track exit links. If you do all the thinking up front, the implementation will be easier and your reporting will be easier and more consistent. Here goes…
- Go here to access the custom campaign builder that we use.
- Enter the appropriate information in the form. You have to enter the “Website URL” and “Campaign Source.” After that, you can enter anything you want into any of the remaining fields…you can also leave fields blank. Just remember your strategy (from above) and be consistent every time you create one of these. Here’s an example:
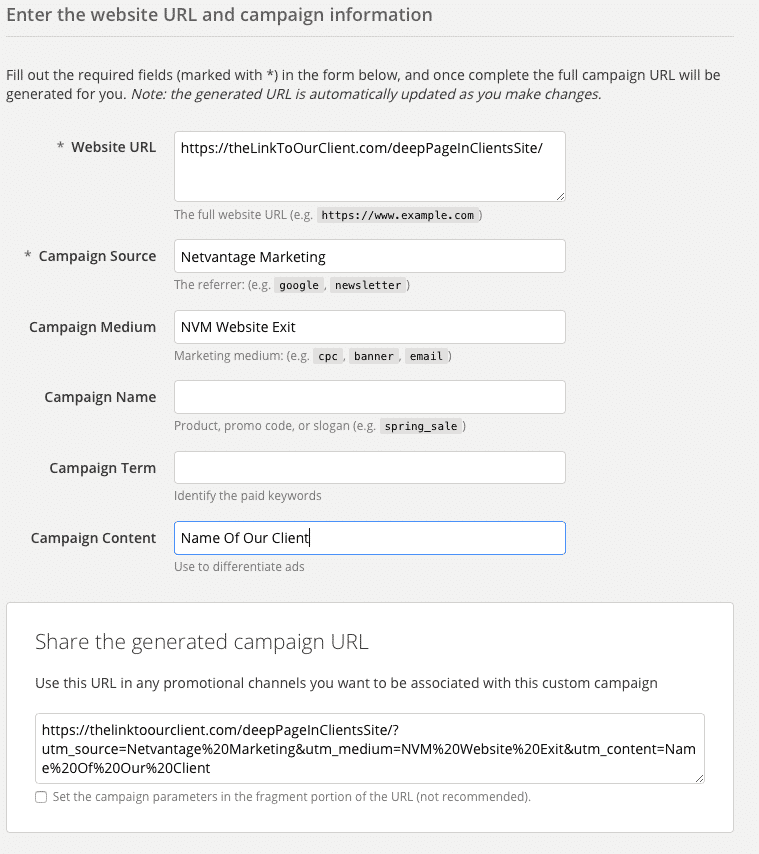
- Take that auto-generated URL and use it on your site as a link to your clients (or whomever’s) site.
- DONE!
Viewing the Data
Now, in your analytics, you can go to Behavior >> Events >>Event Label and use the quick filter box to isolate any of the URL click exits from your site. In our case from above, we would probably enter “Name Of Our Client” to only show links that went from Netvantage SEO to one of our clients.
As an added bonus, if your clients are technically savvy, they can look in their own analytics under Acquisition >> Campaigns and they can filter their data to see how many referrers your website is sending over. Not bad!
The End
At this point, this post is nearly 1,000 words and what feels like a million modified screenshots and I’m just plain tired of writing. I hope this helps you. Also, I’m almost certain that there are better ways to do this so I’d love to hear your ideas in the comments.

Leave a Reply