Last Updated on June 15, 2023 by admin
The title says it all. Like so many web professionals all over the globe we rely heavily on Google Analytics to tell us what is going on with websites that we manage. At Netvantage SEO we take it a step further and import that analytics data into Google Sheets to create dashboards for ourselves and our clients. I’ve written about creating a Google Analytics dashboard using Google Sheets before and, unsurprisingly, we’re still using that same method…until now…
As most everyone knows at this point, Google is sunsetting Universal Analytics (which I’ll call GA3) and forcing everyone to switch over to the godawful abomination that is Google Analytics 4 (GA4). The horrible shittyness that is GA4 is fodder for a different article but the fact remains that the GA3 connector for Google Sheets (as described in my previous writing) will cease functioning at the same time as the analytics engine that drives it. So, in this length of prose, I will detail how to update your dashboards to take advantage of GA4.
Two quick things:
- The Chrome extension for GA4 is much easier to use than the GA3 version.
- After a 14-day trial, you have to pay for it (but it’s not crazy expensive).
Disclosure: Neither Netvantage SEO nor I personally are affiliated with nor do we in any way benefit from others using this tool. This is something we use internally and we pay full price to do so. You are reading an account of our personal experiences.
Like the prior article, I’ve created a sample spreadsheet for you to download and manipulate as you follow along.
Installing the Extension
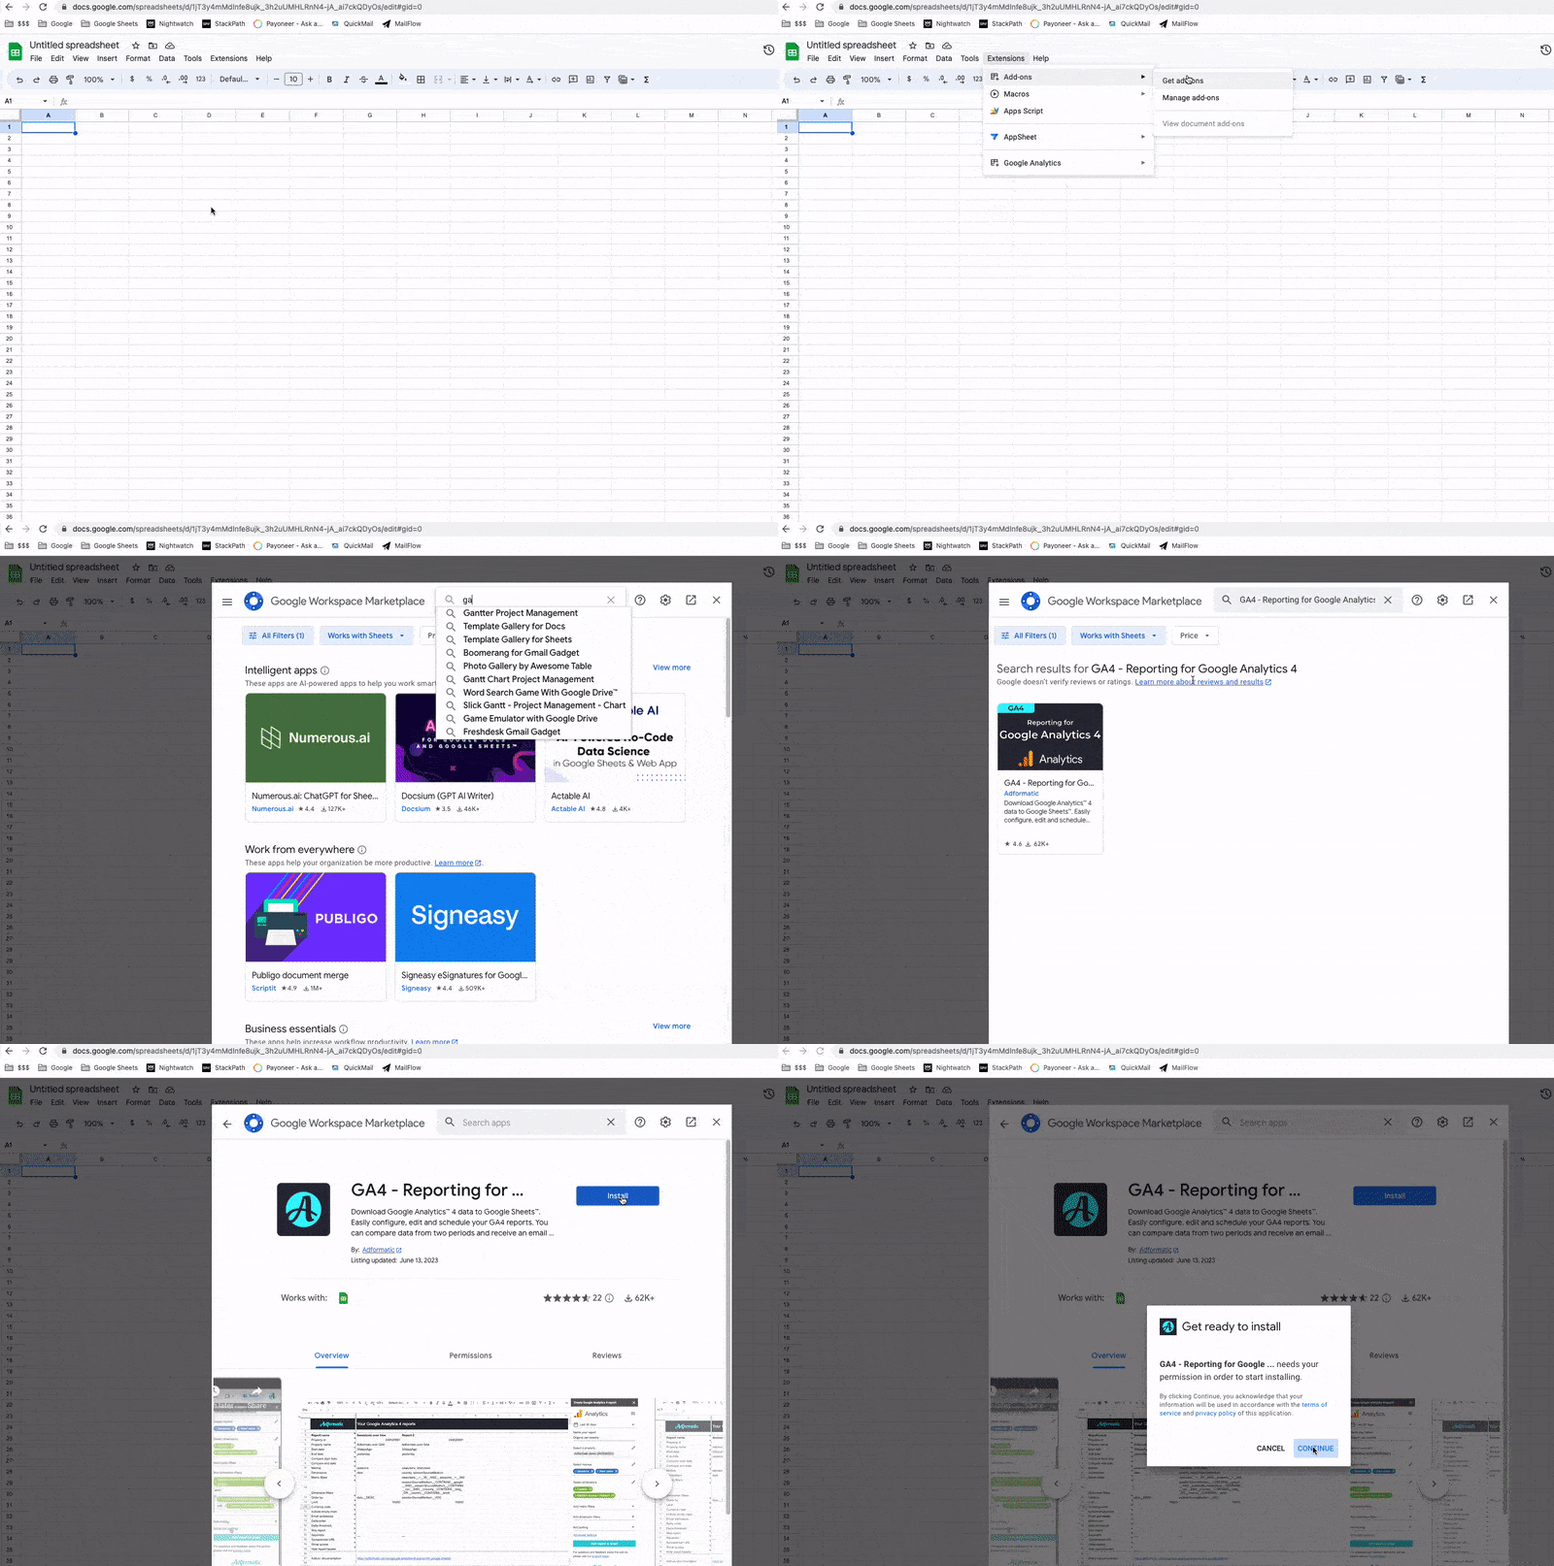
I’m going to run through this really quickly because you probably already know (or can figure out) how to do this.
- Open a new Google Sheet
- Click Extensions –> Add-ons –> Get Add-Ons
- Click in the search box at the top of the window and type “ga4”
- Select “GA4 – Reporting for Google Analytics 4”
- Click the tile for the extension by Adformatic
- Click “Install”
- Click “Continue”
- Give the app the appropriate permissions and finish the installation.
Creating Your First Report
You must use the extension to create your first report. You cannot do it manually.
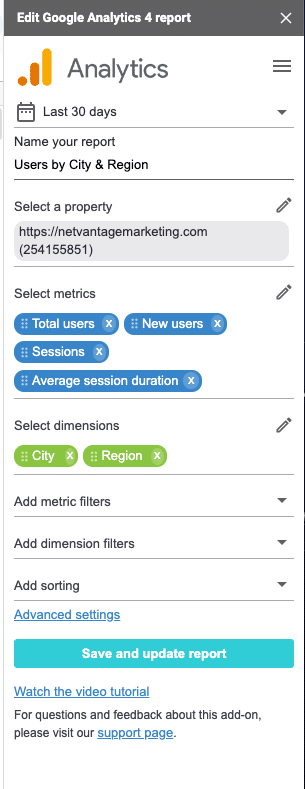
Click Extensions –> GA4 – Reporting for Google Analytics 4 –> Create Report. You’ll see a cute little interactive form pop up to the right side of your screen. Starting from the top you will need to fill out or select:
- The Report Time Period. Many “quick select” time periods are available and there is a “compare” toggle near the bottom to allow you to compare prior time periods. For this example let’s choose “Last 30 Days” and set the “compare” to “previous year.”
- The Report Name. Give it something snappy and memorable. This will become the name of the newly-created tab in your sheet. For this example, I’ll choose “Users by City & Region.”
- The Property. This is something I really like about this add-on. It automatically populates a list of GA4 Accounts and Properties so you just have to point-and-click. The fields are also searchable so typing two or three letters that are found in the property name really narrows things down a lot. We manage hundreds of different client properties and this addition to the interface is very welcome. I will select our own Netvantage SEO account for a demo.
- Metrics and Dimensions. There are approximately eleventy-gajillion metrics and dimensions to choose from when you build your report. You must choose at least one of each. The form is self-explanatory and more details can be found in Google’s GA4 Dimensions & Metrics Explorer. For this example, I’ll choose “Total Users, New Users, Sessions, and Avg Session Duration” for my metrics and “City” and “Region” for my dimensions.
- The Rest of It. You can add separate filters for both metrics and dimensions and you can apply sorting rules as well. These are optional and I’m going to skip them. If you need additional assistance there is a link for a video tutorial or you can always visit the plugin creator site for details.
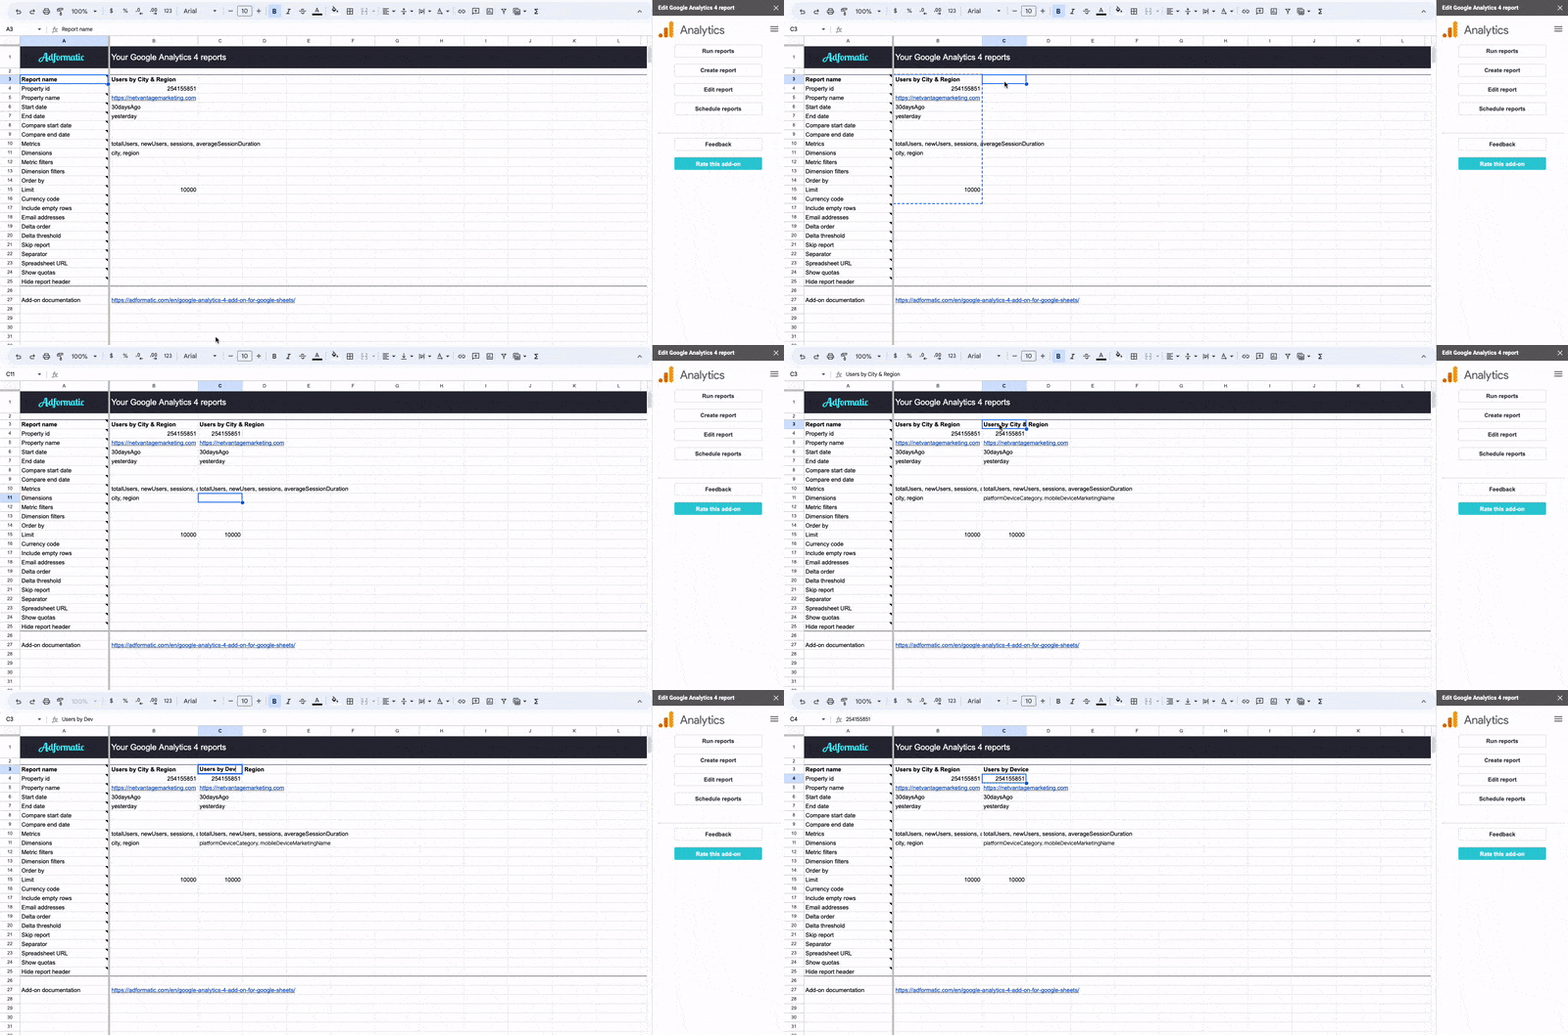
In the end, click “Save and Update Report.” This will create a new tab called “Configuration GA4 Reports.” Additionally, you will see new options in the space where the form used to be. Take a look at the new configuration tab. It’s very similar to the layout of the previous GA3 add-on. Now that you’ve created one report, you can manually edit this sheet to adjust the dates, metrics, dimensions, filters, etc. You can also copy a whole column’s worth of data, paste it into the next column, make some minor changes (including to the report name), and you just quickly created a whole new report.
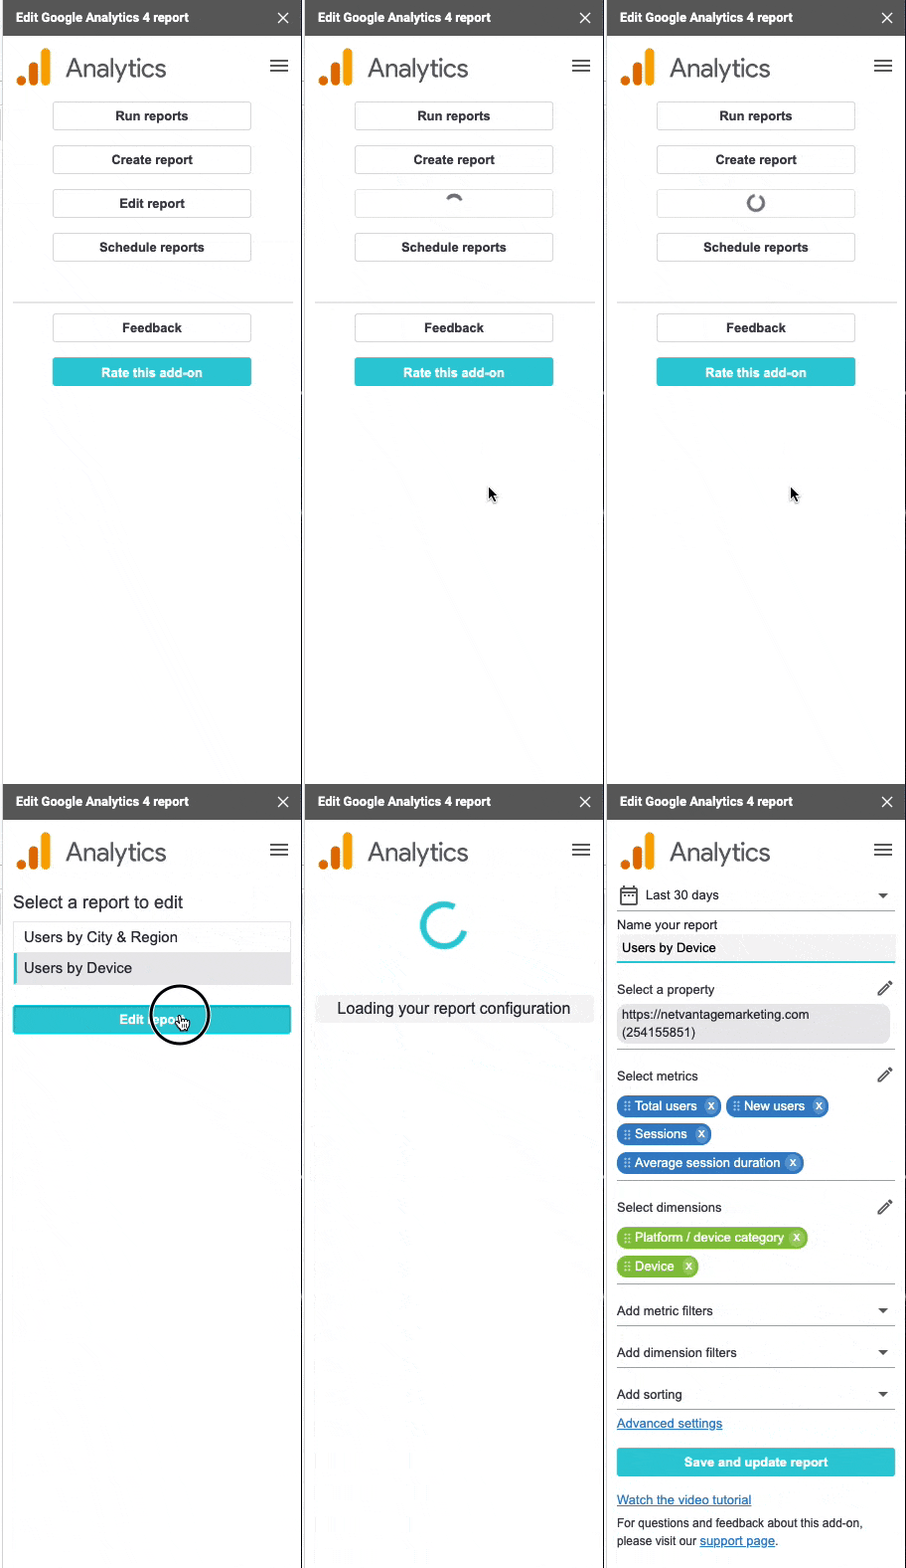
Now, if you again click “Edit Report” the add-on will give you a choice of which report you wish to edit. (Previously, when there was only one report, it would automatically load that report.)
If you click “Run Reports” you will be presented with an interstitial overlay that shows the progress of the report creation. You will then notice a new tab (or updated tab) in the spreadsheet which corresponds to the report name in your configuration.
You can go back to edit and run the reports as many times as you like. Two notes about that:
- If you edit the time frame, metrics, dimensions, or other details of a report, the add-on will overwrite any previously existing data on the report tab.
- If you rename the report–even without changing any of the other details–the add-on will create an entirely new tab with the details requested.
I don’t feel like either of these is good or bad…it’s just how it works…and it’s better to know upfront.
Next Steps
Now you should have at least three tabs on your spreadsheet–a configuration tab and two report tabs. If that’s all you need then you’re done! Usually, however, you would want to make a Dashboard of some kind.
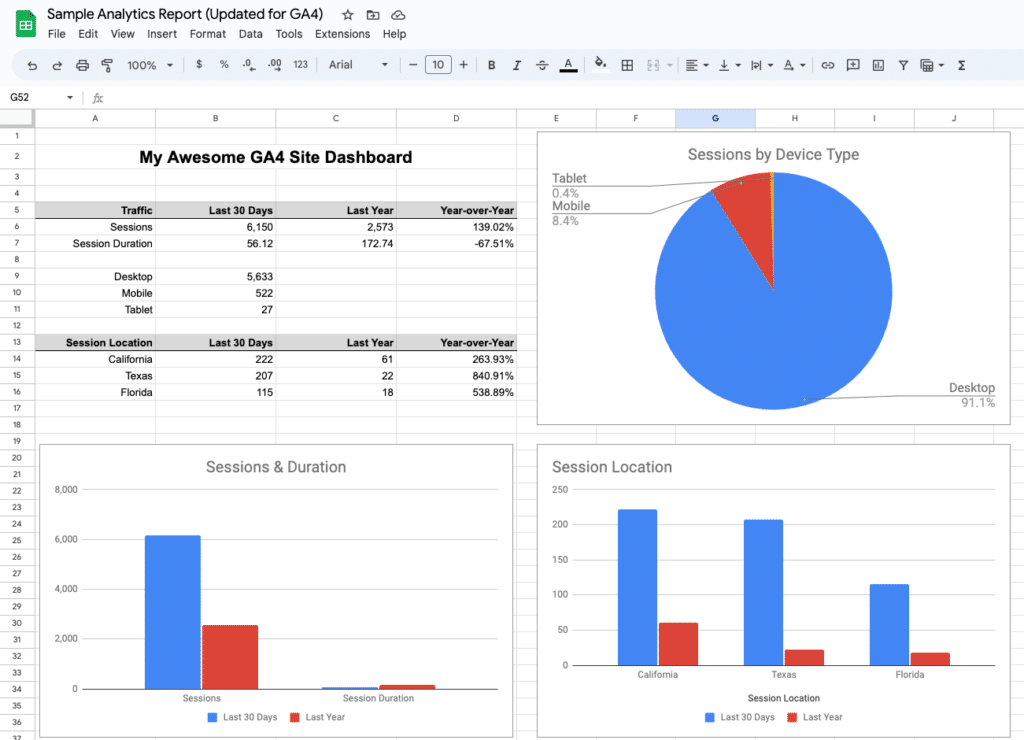
The dashboard you create is up to you. It will take a little bit of spreadsheeting skills and there are loads of online tutorials about how to do that. Take a look at the super simple dashboard that I created for this project.
Scheduling
You probably want this to auto-update. After all, you can only build knowledge if your data is fresh. This particular add-on provides that feature as well. Click “Schedule Reports” either from the Extensions menu or from the button in the right-side form we’ve been using. A box will pop up allowing you to schedule your reports with a lot of flexibility.
Conclusion
It’s taken a few hours to create the spreadsheet and dashboard and write up this brief tutorial…and I feel like I’ve barely scratched the surface of what’s possible here. I’m sure you can think of 100 other important items to include on the dashboard. If you have something specific you’d like to share let me know about it!

Leave a Reply